S00 Ray Gen Only
Corresponding sample code can be found here.
Introduction
Overview
Welcome to the GPRT samples course! GPRT is an open source raytracing library that allows developers to quickly prototype ideas involving high-performance ray tracing. It is optimized for NVIDIA, AMD and Intel Arc architectures, and support for CPU architectures is coming soon! By following these examples, you’ll be able to leverage GPRT’s comprehensive feature set and create your own high performance ray tracing applications.
Objective of this Sample
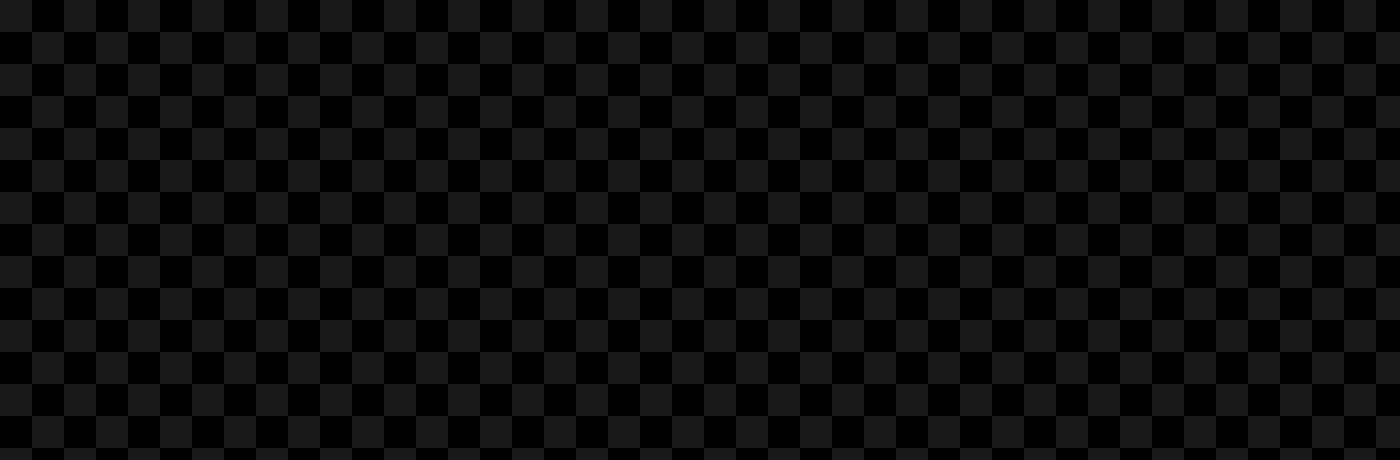
In this first example, we’ll use GPRT to render a basic checkerboard pattern. Traditionally, checkerboards serve as a good diagnostic test to reveal any possible issues with a display; but for us, it serves as an easy pattern to generate and will enable you to get something running before moving onto more advanced concepts.
After running this example, you should see an image like this appear on your screen and be saved as s00-rayGenOnly.png in the same directory as the sample’s executable:
Setting up a GPRT Sample
File Structure
All of the samples in this repo follow a very similar four-file structure. In the s00-rayGenOnly directory, we have four files: CMakeLists.txt, sharedCode.h, deviceCode.hlsl, and hostCode.cpp.
CMakeLists.txt tells our CMake build system how to compile our code into an executable or library.
sharedCode.h defines common data structures shared between our ray tracing device and our host system. The code in this file needs to be carefully written to compile with both HLSL and C++.
deviceCode.hlsl defines all programs we would like to run in parallel on our ray tracing device, written using the HLSL programming language. You might also see these programs called shaders or kernels.
hostCode.cpp defines our main function on the CPU that we will use to orchestrate what kernels to run on the device and how. This might include what parameters we pass to these kernels, how many threads to launch, and so on.
Configuring the Build System
The first step in using GPRT is to configure how to compile our code together into an executable. Our samples do this by using the CMakeLists.txt files. In a typical workflow, this CMake file would be configured as follows:
The embed_devicecode macro sets up a compilation target for our
deviceCode.hlsl into assembly we can run on our raytracing device.
This assembly is then embedded into a .cpp file matching
the OUTPUT_TARGET name.
Note
For another minimal example, check out the CMakeLists.txt in this project
Creating our Checkerboard Test Pattern
The second step is to write our GPU program. To create our checkerboard test pattern, we’ll write a small program that will run in parallel on our ray tracing device, where we’ll use individual threads to generate our pixel colors.
Device Code
Next, we’ll create a Ray Generation Program that will run in parallel on the device. Normally, we use these kernels to generate rays to trace into the world. However, in this example we’ll just be creating a checkerboard background.
In the code above, we declare our ray generation program using the macro
GPRT_RAYGEN_PROGRAM.
This macro is defined in gprt_device.h,
and it’s purpose is to allow us to write multiple kernels all in the same HLSL
document.
This macro takes in the name of the kernel and the type and name of its shader record. In GPRT, every kernel receives a shader record, which acts as a block of parameters that are made available to the kernel when it’s executed on the device.
This raygen kernel runs the same code in parallel over many different threads. In
our case, we will run one thread per pixel. We read the thread ID using
DispatchRaysIndex, as well as how many threads were launched using
DispatchRaysDimensions. We use the thread ID to determine which checker type
our pixel lies within, and use gprt::store to store our color into our
framebuffer at the given location.
Also, just like on the CPU, we can use printf to print out helpful debug messages!
Host Code
As our final step, all that’s left is to write our host side code.
We begin by requesting a window and creating a GPRTContext:
After that, we create a GPRTModule, which acts as a container that will hold
our compiled device kernels.
Because we’re using two different devices to run our code (normally a CPU and a GPU), we have two separate compilation steps. The device code is compiled first, then the binary from that compilation step is embedded into our host side code. This way, GPRT executables are “standalone”, and don’t need to carry around compiled shader files.
Creating our Raytracing Pipeline
Next, we’ll setup our ray tracing pipeline. We’ll talk more about the ray tracing pipeline in the next example, but essentially, it’s a collection of GPU programs that all operate together.
In this example, our ray tracing pipeline is super simple: just a single ray generation program.
Note
To create a handle to our ray generation program, we need to pass the name of the program–here it’s “simpleRayGen”–as well as the shader record type–which is our struct RayGenData that we previously declared in our “sharedCode.h” file.
Note
Many GPRT handles can be made in one of two ways: GPRTHandle and
GPRTHandleOf<T>. The first is a more raw C-like API, while the latter
uses C++ templates to increase type safety and help users reduce bugs
that might occur from incorrect void* casting.
Setting Parameters
Next, we can pass data back and forth between the ray tracing device in two ways: through
constant uniform values, and through buffers. Uniform values are like single values,
like our two float3 color values used by our checkerboard. Buffers on the
other hand are allocated regions of memory which contain many values–for example,
an array of pixel color values. Buffers can be read from and written to by both
the host and the device, while uniforms can only be written to by the host, and
are read-only on the device.
To represent our checkerboard image, we’ll use a buffer of uint32_t,
where the first 8 bits represent the blue channel, the next 8 bits represent the
green channel, then red, and finally alpha.
Note
To create a buffer, we can use either gprtDeviceBufferCreate, gprtHostBufferCreate,
or gprtSharedBufferCreate. As their names suggest, buffers made by
gprtDeviceBufferCreate will reside on our ray tracing device, while buffers
made with gprtHostBufferCreate will reside on our host system memory.
Buffers made with gprtSharedBufferCreate reside in a memory space shared
between the host and the device called “BAR”, and is limited to 256MB on
systems without resizable BAR.
Next, we’ll pass our uniform values through the shader record belonging to our
ray generation program. For our example, these uniforms are our checkerboard
colors, as well as the device address to our frame buffer. To pass these uniforms,
we first fetch a handle to our shader record using gprtRayGetPointer. Once
all parameters are set, we upload the values of these parameters to our device
by calling gprtBuildShaderBindingTable.
Launching our Program
Finally, we can launch our ray generation program to create our checkerboard image.
To do this, we call gprtRayGenLaunch2D, giving our ray generation program to use as
well as the number of threads we would like to execute concurrently. Then, to present
our framebuffer to the screen, we call gprtBufferPresent. We do this in a loop until
the window’s “X” button has been clicked, at which point we save the framebuffer to an
image using gprtBufferSaveImage.
Cleaning Up
When our program completes, we need to destroy all the objects we created. The order that these objects are destroyed is important, because some objects depend on others to function properly. In general, we destroy our objects in the reverse order that they were made.
Conclusion
If you’ve followed along so far, congrats! Although this example is relatively simple, we’ve covered a lot of the key concepts you need to know in order to get up and running tracing rays.
In the next example, we’ll create a single triangle, and trace rays to intersect that triangle. We’ll be able to manipulate this triangle as well using some very simple camera math.